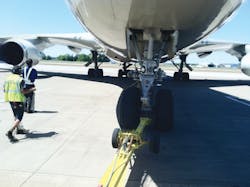
Let’s take a look at how to maintain a piece of equipment that is often overlooked – the aircraft towbar.
Typically, towbars are only used for a few minutes at a time. Just as typically, a problem is discovered when a hurried ramp agent quickly retrieves a towbar to take to a waiting aircraft – exactly when it is usually too late to do anything about it. Sounds like a delay that could have been prevented.
Towbars, like all GSE equipment, should have scheduled preventative maintenance. It is also a great idea to conduct a daily inspection. This can be quickly accomplished while your technician does other daily inspections or fluid level checks.
When a towbar is due for a scheduled inspection, there are many items to be checked. Since there are many types and manufacturers of aircraft towbars, the unit’s maintenance manual can really help to ensure all areas are covered.
For example, an older style DC-8 towbar has a lot less moving parts than a newer MD11 or 747 towbar and, thus, doesn’t require near the time or effort for inspection.
Here are some key items to be checked and/or lubricated during inspection:
Shear pins – These items share the bulk of the load while the aircraft is being pushed or towed. They are designed to break at a certain PSI limit to lessen the possibility of aircraft damage. They should be removed and checked for straightness, indentions, cracks and overall condition. If a shear pin is suspect in any way it should be replaced.
We heard of a recent incident where both shear pins on a 747 towbar snapped simultaneously during an aircraft push. The pushback operator was not quite quick enough on the brake, and the towbar head pivoted into both nose gear tires, cutting the side walls. Of course, the aircraft was towed back to the gate and the tires were replaced. Not a cheap undertaking when you consider the late aircraft and the price of tires and labor.
Head mechanism – Whether your towbar uses a clamp-style or pin capture-style, there are many moving parts to inspect. All linkages and moving parts should be checked for wear and lubricated. The actuator handle should be checked to make sure it positively locks into position. And finally, if the head is of a pivot design, the pivot bolt should be removed to check its condition.
Towbar body – The body or tube of the towbar should be closely checked for cracks and overall straightness. If a crack is discovered, the best idea is to take the unit to certified welder for repairs. Spending a little more now can save a lot later. If the towbar is bowed from end to end, it should be taken out of service immediately until the body can be replaced.
Lift mechanism – Most wide-body towbars use a lift mechanism to raise the head of the heavy towbar to meet the nose gear. This also lifts the towbar wheels above the ground after the unit is connected to the aircraft. The manual pump should be checked for leaks and the proper fluid level. The hoses to the lift cylinder should be checked for cracks, leaks, and a deteriorating outer sleeve. The lift cylinder should be checked for leaks around the gland seal as well.
Wheels, tires, hubs and carriage – The towbar wheels should have their lugnuts checked for tightness. The wheels should also be checked for dents, straightness, and cracks near the lug holes. The wheel hubs should be disassembled every two years. At this time, the bearings should be cleaned, inspected, and repacked with fresh grease. The wheel seals should be replaced during assembly as well. The rotating carriage and axle shaft should be checked for cracks, tight hardware, and overall straightness.
Tow ring or lunette – This is the part of the towbar that connects directly to the pushback tractor. If it is a solid, welded-on design, it should be closely inspected for cracks and deformation. If it is a swivel-type lunette, it should be disassembled. The threaded shaft should be checked for straightness, deformation, and cracks. The shaft’s threaded area should be checked for stripped, missing, or pulled threads. The shaft’s nut should be of a locking design and the threads should be thoroughly checked as well. The assembly should be put together with a light film of lubricant and should swivel freely.
Once the entire towbar has been inspected, it is a good time to perform corrosion control.
Towbars tend to get plenty of scratches, scrapes, and nicks. A light sanding is usually all that’s required to take the surface down to bare metal. After a little bit of primer and paint, any company decals and unit numbers can be replaced as needed. Your towbar will now be 100 percent serviceable and look better while performing its duty.
About the authors: Kenneth DeVolpi, manager of GSE and operations, has worked for Matheson for more than four years and has been in the aviation industry for more than 25 years, including 15 years with Northwest Airlines. Jason Chapman works in the company's GSE maintenance department and gained GSE mechanical experience with the U.S. Air Force and has worked in the commercial GSE industry for 12 years.


