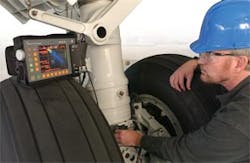
Ultrasonic inspection is a powerful, effective form of nondestructive testing in aviation maintenance. But it is also a technique that has room for error due to improper equipment setup, calibration, and an inexperienced tester.
To get a clear picture of ultrasonic inspection, AMT spoke with Christine Murner. She is the aerospace marketing leader for GE Sensing & Inspection Technologies.
AMT: What is ultrasonic inspection?
Murner: Ultrasonic inspection uses high frequency sound energy to detect internal flaws or to characterize materials.
An ultrasonic test instrument generates high voltage electric pulses, which are converted to high frequency ultrasonic energy by a transducer. The transducer introduces and directs the energy into the part in the form of sound waves.
When these sound waves encounter a defect or discontinuity, part of the energy is reflected back from the flaw surface. The reflected wave signal is transformed into an electrical signal by the transducer and is displayed on the instrument screen where trained personnel can discern critical information about the flaw or discontinuity.
AMT: How applicable is ultrasonic inspection to aviation maintenance?
Murner: Ultrasonic inspection is a versatile technique that can be adopted for simple thickness measurement and flaw detection, as well as more complex uses including quantitative NDE in portable or automated systems.
Ultrasonic phased array (UTPA) is a quite popular technique, which uses an array of transducers electronically controlled. UTPA requires more sophisticated instrumentation to gather the multitude of digital data collected, but it has the advantage of imaging diagnostics, wide area scanning, the ability to focus or steer the sound waves, and a better probability of detection.
AMT: What materials and components can be tested using ultrasonic inspection?
Murner: Ultrasound inspection is used to evaluate many different types of materials and kinds of parts. Materials that can be tested include aluminum, titanium, steel, various alloys, and carbon fiber reinforced plastic (CFRP) composites. The kinds of parts that can be inspected this way include lap joints, bonded structures, landing gear, airfoils and engine components, and raw materials, among others.
AMT: OK; please walk us through the proper methodology for conducting an ultrasonic inspection.
Murner: An ultrasonic sensor which sends and receives sound energy is called a transducer. In ultrasonic testing, a transducer connected to a diagnostic instrument is passed over the instrument to be evaluated. In order to maximize the transfer of sound waves to the part, this testing is done while the parts are immersed in water (immersion testing) or with a couplant such as oil between the test object and the transducer.
Ultrasound testing can be performed based on reflection or attenuation. In reflection (pulse-echo) mode, the diagnostic instrument displays the amplitude signal representing the intensity of the reflected sound and distance.
In attenuation (through-transmission) mode, a transmitter sends ultrasound energy through one surface and a separate receiver detects the amount that has reached it on another surface after traveling through the medium.
AMT: What are the limits of ultrasonic testing?
Murner: To be successful, the surface of the test specimen must be accessible to transmit sound for evaluation.
Ultrasonic testing normally requires water or other coolant to provide effective transfer of the ultrasonic wave energy between the transducer and the parts being inspected. You can’t do it in air.
Ultrasonic inspection is highly accurate in determining reflector position and estimating size and shape, but sophisticated technical knowledge is often required to develop inspection procedures.
Additionally, training to perform the testing can be more lengthy than other NDT methods.
AMT: So this means that inaccurate ultrasonic inspection results can be caused by ...
Murner: ... improper training, setup, and calibration of the equipment to perform the inspection for best results.
AMT: One last question: What is the most important thing to remember when conducting an ultrasonic inspection?
Murner: A thorough understanding of the materials involved, processes, and application to yield the best results nondestructively. AMT


