There are several issues that need to be addressed when it comes to requesting nondestructive testing (NDT) namely type of inspection, type of discontinuity to be detected, probability of detection (POD), technical requirements, and personnel requirements.
“What’s in a name?” a famous phrase that can have so much meaning, or in some cases so little meaning. There seems to be a tremendous need, not just in the aviation maintenance community, but across the board, to become familiar with the NDT methods available and the limitation of each of those disciplines.
Over the years some terms such as “Zyglo,” “Magnaflux, and “X-ray,” have become commonplace although they are not exactly correct. Zyglo and Magnaflux are actually trade names, related to penetrant and magnetic particle inspections respectively. Just as “Xerox” many times is used to denote producing a facsimile so too are some trade names related to NDT. X-ray simply defines a specific form of electromagnetic radiation with a wavelength in the range between gamma and ultraviolet radiation, and is often confused with the proper term of “radiography.”
Select the Right Inspection
The point here is to highlight the need to be able to provide the appropriate technical information for requested inspections. It isn’t uncommon for maintenance processes to request an NDT inspection, and not know what type of inspection is needed. An example of such would be a request made for an eddy current inspection to be performed on a carbon-fiber panel (without conductive mesh); one problem exists, it’s not conductive; it can’t be done. Additionally, typically the inspection required for laminar composites is sonic or ultrasonic. There are many other scenarios where this occurs. An excellent source is available to help individuals select the appropriate NDT discipline — “Choosing NDT Applications, Costs, and Benefits of Nondestructive Testing in Your Quality Assurance Program” (American Society for Nondestructive Testing, 1987) — a long title but an invaluable tool for the NDT user and in some cases the practitioner.
Methods and Certification
It’s been stated on many occasions that NDT is not a panacea, and no single method will provide all the possible relevant data for a specific application. This is only compounded when an inappropriate NDT test is requested, typically due to lack of knowledge. Generally it isn’t up to the NDT technician to select the appropriate discipline to be used. Several issues need to be considered in determining the proper NDT method which include the following:
a. Minimum size of discontinuity to be detected
b. Type of material being tested
c. Fabrication process
d. Orientation of discontinuity
e. Direction of propagation
f. POD (probability of detection)
Another issue that is often overlooked is the certification and qualification of the personnel performing the NDT tasks. In most circumstances the certification requirements are listed in the governing technical documentation. As an example, it is not uncommon for personnel to be required to be certified in accordance with ASNT’s SNT-TC-1A as a minimum Level II technician in order to perform and evaluate the results of any inspection. Often other certification requirements come into play (NAS 410, ATA 105, etc.); however it is up to the user to determine that the certifications are appropriate to the task requested. There are considerable differences in the certification program as the following shows:
The Aerospace Industries Association’s National Aerospace Standard for Certification and Qualification for Nondestructive Test Personnel, NAS 410, requires 80 hours total formal classroom training for Level II certification in ultrasonics, and 1,600 hours of experience.
The Air Transport Association of America Guidelines for Training and Qualifying Personnel in Nondestructive Testing Methods, ATA 105, requires only 40 hours total formal classroom training for Level II certification in ultrasonics and 1,440 hours of experience.
Again, “Level II” can be misleading if one isn’t aware of the certification requirements.
Additionally there are different requirements for the physical (eye) exams. It should be evident that there is a need to assure proper certification so that it meets the intended requirements.
A competent Level II technician should always request the appropriate technical data — which provides direction related to the task, and will in most cases be able to determine if the requested task is applicable to the technical documentation.
Probability of Detection (POD)
Probability of detection (POD) is another issue that is of concern and should be considered prior to the inspection process. This is not an issue that would be determined by the practitioner nor the user, but by the developers of the actual testing requirements, i.e. engineering or manufacturing. This value is very important in determining the proper NDT method. The objective is to have a high POD and a high confidence level. Basically we want to be as certain as possible that the inspection is capable of detecting the discontinuity of interest. A random, “shoot-from-the-hip” approach is obviously not the correct way to tackle an inspection problem.
Not too long ago a client contacted the company to schedule an “NDT inspection” on the fuselage of an aircraft. When questioned as to what kind of “NDT inspection,” the client had no response — he would have to get back to us. Later, came the information, it was an eddy current test. When the technician showed up with the eddy current unit, various probes, and several reference standards — it was to no avail. The actual inspection requirement was for bond testing on a composite panel.
This wasn’t the client’s fault completely, the service company didn’t request enough information, and had it been an eddy current test, was it high, medium, or low frequency? What was the inspection for — conductivity, flaw detection?
Hopefully it can be seen that there is a need to use the appropriate terminology related to NDT, and that there are several considerations in selecting a specific NDT method. It is usually a good idea to confer with someone experienced in the field; usually an NDT Level III or an experienced engineer can provide sound guidance if there are any questions.
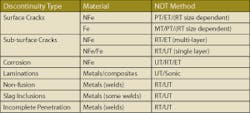
The above chart is a sample quick reference only and does not purport to address all processes, materials, or conditions. Visual testing (VT) can be performed on any component when inspecting for surface discontinuities, and should always be included when applicable. Additionally the chart doesn’t detail specific techniques that may be required for a particular NDT method.
It should be realized that no one single NDT process is capable of providing every bit of pertinent data related to a specific inspection, and the chart provides the most common methodology for detecting the most common types. Therefore it is necessary for all involved in the NDT process — buyer to practitioner — to make every effort to use the proper terminology in an effort to become more efficient in the inspection process.


